


SPU Fan Club Card!
Check this out! It's a FREE card that gives you 3% off your purchases at SPU Shop!

Find Me


CU Licenses


Script Tester For
 and
www.creationbysanie.blogspot.de
and
www.creationbysanie.blogspot.de
Sunday, June 2, 2013
CT Tut Girl Next Door

This tutorial was written on June 1, 2013. Any similarity to
any other tut is purely coincidental.
You Will Need:
Tube of choice. I used one from Keith Garvey. You must have a
license to use his work. You can find his work here.
PTU kit “Girl Next Door” from Kandii
Popz Designz.
Mask: Mask 249 from WSL
The plugin Eye Candy Impact Glass
Terms
to Know:
C&P-Copy
and paste
SAFDI-Selections>Select
All>Float>Defloat>Invert
SAFD-Selections>Select
All>Float>Defloat
DS-Drop
Shadow (The settings I used for all my layers were: -3,-3, 50, 5, black)
Crop
to Selection- Ctrl+a on the layer below the one you just pasted a paper (or
object) on. Back to the paper (or object) and Shift+r.
·
Open a
new image 600x600. Open P6. Resize to 600x600. C&P. Open Glitter.
Image*Free Rotate (be sure “All Layers” is UNCHECKED) and rotate left 45
degrees. Objects*Align*Center in Canvas. Resize 104%. Duplicate. Image*Flip
Vertical. Merge down and DS.
·
Open your mask. Layers*New Mask Layer*From
Image and choose your mask Merge group. Resize 108%. Objects*Align*Center in
Canvas
·
Open
Frame 1. Resize 93%. DS. Open your tube. Place it to the left of the frame.
Duplicate it and move the duplicate under the frame. Activate the frame layer
SAFD. Activate the top tube layer and erase anything you don’t want sticking
out of the frame. Invert the selection and erase the parts showing outside the
edge of the frame on both tube layers. Selections*Select None. (The reason we
did it this way is for two reasons: !) If you only use the top tube layer and
erase outside the frame, there is a small gap and 2) we can DS the top tube
layer so the shadow is in front of the frame, rather than being hidden behind
it and the frame DS can also be on the tube.) Activate top tube layer and DS.
·
Open
Glitterhearts. C&P. Image*Free Rotate (be sure “All Layers” is UNCHECKED)
and rotate right 45 degrees. Resize 86%. Position on the lower right of the
frame.
·
Open
Star. C&P. SAFDI. Open P13. C&P then hit delete. Crop to Selection.
Hide or delete the original Star. Resize your pink Star 56% and position on the
lower right of the frame. Adjust*Add/Remove Noise*Add Noise Gaussian 50%
Monochrome.
·
Open
P11. Resize 200x200. C&P. Move the layer below the star and position the
paper so that it will fill the star. Using your magic wand, select the inside
of the star. Selections*Modify*Expand 2. Invert the selection. Activate the P11
layer and hit delete. Invert the selection again. Layers*New Raster Layer.
Effects*Plugins*EC Impact*Glass with these settings:
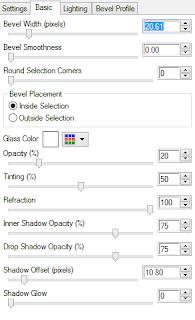

Select None. DS.

·
Open
Crown. C&P and resize 51%. Position it where you like it on the frame. DS.
·
Open Zippedheart.
C&P and resize 44%. Position where you like it. I placed it beneath the
star. DS.
·
Open
Glasses. C&P and resize 72%. Position where you like them.
·
Open
Shoes. C&P, resize 63% and position how you want them.
·
Open
Bunny. C&P and resize 81%. Position where you like it.
·
Open
Ipod. C&P and resize 25%. Position where you like it. Add DS to this and
other layers if you want.
·
Select
the Text tool and type out your name (I used Fiolex Girls, 16pt, 1pt stroke).
Convert to Raster Layer. Adjust*Add/Remove Noise*Add Noise Gaussian 25%
Monochrome. DS.
·
Add
your CR info and you’re done! Thanks for using my tut J. Please leave
me a comment, and feel free to show me what you did with it. I’d love to see!
Subscribe to:
Post Comments
(Atom)
Snag a blinkie

0 comments:
Post a Comment