Scraps by http://scrappinkrazydesigns.blogspot.com/. Powered by Blogger.
SPU Fan Club Card!
Tuesday, August 13, 2013
FTU CT tut with Orange Emo
This tutorial was written on August 12, 2013. Any similarity
to any other tut is purely coincidental. I use PSP X5, but you should be able
to do this in any version.
You
Will Need:
Tube
of choice. I used a FTU tube “Barbara Babelicious” by Amberly Berendson. You must have a license to use her work. You can
find it here.
Plugin:
Alien Skin Eye Candy Glass (optional)
Mask 162 from Vix.
Terms
to Know:
C&P-Copy
and paste
SAFDI-Selections>Select
All>Float>Defloat>Invert
SAFD-Selections>Select
All>Float>Defloat
DS-Drop
Shadow (The settings I used for all my DS layers were: 3, 6, 50, 5, black)
Crop
to Selection- Ctrl+a on the layer below the one you just pasted a paper (or
object) on. Back to the paper (or object) and Shift+r.
Center
in Canvas- Objects>Align>Center in Canvas
Apply
Mask- Layers>New Mask Layer>From Image and choose your mask.
Add
Noise- Image>Add/Remove Noise>Add Noise (My default settings are
Gaussian, 50%, Monochrome)
All instructions
regarding tubes assume you are using the same tube I did. If you use a
different one, adjust size/placement accordingly.
© Open the template,
Shift+d to duplicate, close original, delete credits. Activate background
layer. Open pp12, C&P, Crop to Selection. Open and apply your mask, resize 122%, Center in Canvas, Merge Group.
© 1: Add Noise
© 2: SAFDI. Open pp2,
C&P, delete, Crop to Selection, Merge Down.
© 3: SAFDI. Open pp8,
C&P, delete, Crop to Selection, Merge Down.
© 4: Open e40, C&P,
Image*Free Rotate right 30 degrees.
© 5: SAFD. Flood Fill
with gradient (linear, 320 angle, 0 repeats). Open e20, resize X:90%, Y:174%
and place where you like it. Activate layer 5. Open tube, C&P, place where
you like it, SAFD. Activate duplicate frame layer, erase everything inside the
marching ants that covers her head and the hair on the left. Select None.
Activate tube and erase anything sticking out of the frame on the right.
© 6: SAFDI. Open pp5, C&P, delete, Crop to
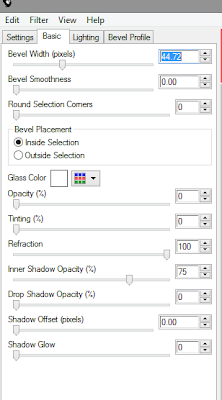
Selection, Merge Down. SAFD, Layers*New Layer, drag above layer 7,
Effects*Plugins*EC*Glass with these settings:
© Activate layer 6. Open
e5, C&P, resize 58% and place where you like.
© Open 25, C&P,
resize 75%, place where you like.
© 7: SAFDI. Open pp7,
C&P, delete, Select None, Merge Down.
© Open e19, C&P, resize
84%, drag to top layer, place where you like it.
© Open e14, C&P,
resize 44%, place where you like.
© Open e11, C&P, resize
35% and place where you like.
© Select your Text Tool
and write your name. I used Glitch 100 pt, no stroke with
the gradient as the main color. Place where you like it, Convert to Raster,
SAFD, Expand 5, Layers*New Layer, Flood Fill with color of choice (I used black)
and drag below text, Add Noise if you want. Activate text, Merge Down.
© Add DS to any layers
you want. Add your CR info and you’re done! Thanks for using my tut J!

Subscribe to:
Post Comments
(Atom)


0 comments:
Post a Comment